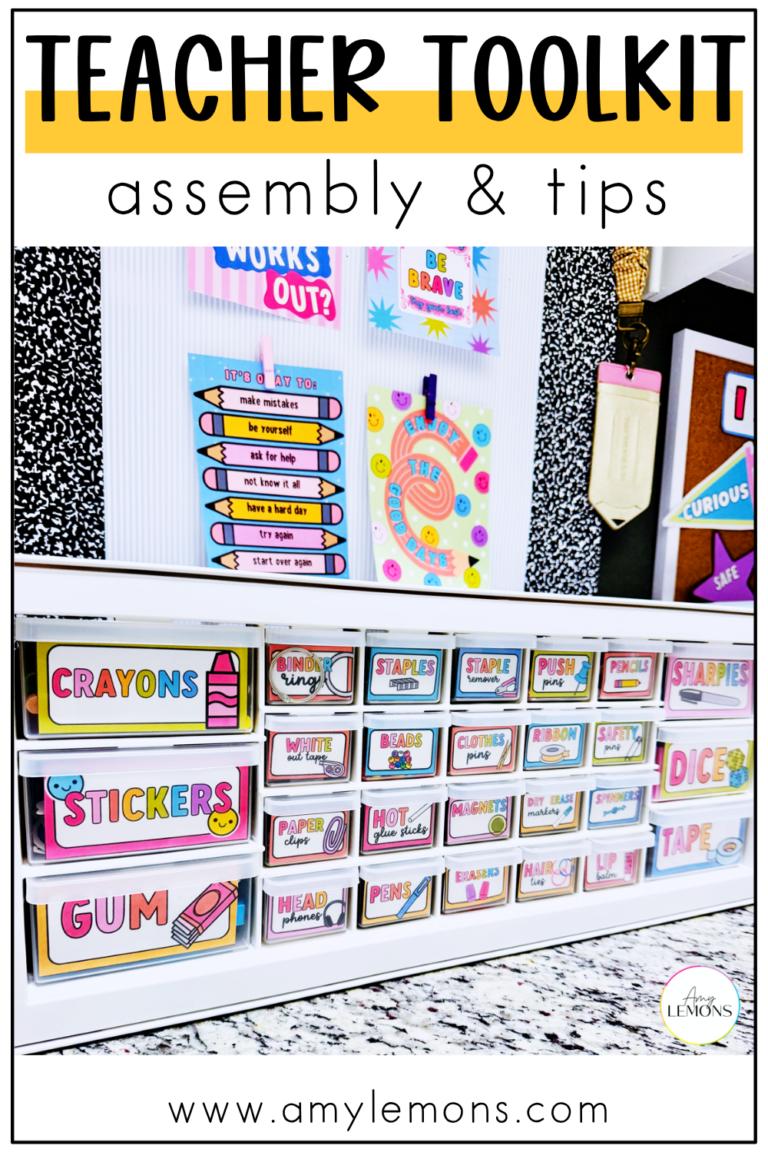
If there’s one thing I learned in the classroom, it’s this: teachers lose a lot of time hunting for supplies. One missing dry-erase marker, paper clip, or push pin can somehow turn into a five-minute scavenger hunt!
That’s exactly why I love having a teacher toolkit — a small set of labeled drawers that keeps all of those little supplies organized, easy to find, and right at my fingertips. Plus, when it’s labeled and color-coordinated, it looks adorable sitting on your desk!
Today I’m sharing how I assembled my Teacher Toolkit, along with a few tips I’ve learned along the way.
Step 1: Print Your Supply Labels

The first thing I did was print the supply labels. Before printing, take a few minutes to think about the supplies you use most often.
Every teacher’s toolkit is a little different!
Some of my must-have supplies include:
- Pens
- Pencils
- Sharpies
- Dry erase markers
- Paper clips
- Push pins
- Staples
- Tape
- Erasers
If your classroom runs on highlighters, binder clips, stickers, or even chocolate (no judgment!), make sure you include those too.
Teacher Tip: Don’t feel like you have to use every label included. Customize your toolkit to fit the way you teach.
Step 2: Laminate and Cut Out for Durability

After printing, I laminated all of my labels.
Laminating helps the labels:
- Last all year long
- Resist tearing
- Stay bright and vibrant
- Wipe clean if they get dusty or smudged
Since the toolkit gets opened constantly throughout the year, the extra durability is absolutely worth the few extra minutes.
Step 3: Add Adhesive

For my toolkit, I used glue tape on the front of each label before attaching it to the drawers.
You can also use:
- Double-sided tape
- Glue dots
- Permanent adhesive
The goal is simply to make sure the labels stay put after months of opening and closing drawers.
Teacher Tip: Before sticking anything down permanently, lay all of the labels out and decide where you want everything to go.
Step 4: Organize Your Must Have Teaching Supplies

Find the toolkit and supplies that I used here
Now comes the fun part! I started filling each drawer with the supplies that matched the labels.
Some teachers like to organize by category:
Office Supplies
- Paper clips
- Binder clips
- Staples
- Push pins
Writing Tools
- Pens
- Pencils
- Sharpies
- Dry erase markers
Classroom Extras
- Stickers
- Magnets
- Tape
- Erasers
Personally, I like placing my most-used supplies in the drawers that are easiest to reach.
Think about your daily routines and organize your toolkit around what you grab most often. If you need some ideas about what to stock, check out a few of my classroom essentials.
| Want the exact labels I use? Grab them inside the GYTO Resource library! These labels are part of a collection of uniquely designed classroom decor that actually supports learning. |
My Favorite Teacher Toolkit Tips

Keep It Near Your Small Group Table
If you teach small groups, this is the perfect place for your toolkit. Everything stays within arm’s reach without interrupting instruction.
Don’t Overfill the Drawers
A drawer that won’t close isn’t helping anyone! Leave a little extra space so supplies are easy to grab.
Label Everything
Even if you think you’ll remember where things go, labels make cleanup faster and help students return borrowed supplies to the correct spot.
Create a “Random Stuff” Drawer
Every teacher has those items that don’t fit anywhere else. Give yourself one miscellaneous drawer and save yourself the frustration.
Restock Regularly
Set a reminder to check supplies at the beginning of each month. A quick five-minute restock keeps your toolkit functional all year long.
Why I Love Having a Teacher Toolkit

My Teacher Toolkit isn’t just about organization; it’s about making my day easier.
When supplies have a designated home:
✔️ I spend less time searching.
✔️ My workspace stays tidy.
✔️ Everything looks coordinated and inviting.
✔️ My desk feels less overwhelming.
And honestly? There is something incredibly satisfying about opening a perfectly organized drawer and finding exactly what you need.
Build a Teacher Toolkit That Saves You Time Every Day
Whether you’re setting up a brand-new classroom or simply looking for a way to organize the mountain of supplies already on your desk, a Teacher Toolkit is one of those small systems that makes a huge difference.
Take your time, make it work for your classroom, and don’t be afraid to customize it to fit your teaching style.
| And don’t forget — the printable labels that make this whole system work are ready for you inside the GYTO Library! |
Your future teacher self will thank you! ✨
Now tell me… what is the one supply you always seem to run out of first? Mine is usually permanent markers!